remove-the-freezer-drawer-from-your-kenmore-elite-refrigerator

How To Remove The Freezer Drawer From Your Kenmore Elite Refrigerator

Welcome to another practical guide from TheKitchenApplianceDad.com. Today, we’re diving into a common but sometimes puzzling task: removing the freezer drawer from your Kenmore Elite refrigerator. Whether you need to clean it, defrost, or perhaps troubleshoot some issues, knowing how to properly remove the freezer drawer is essential. Let’s get started!

Reasons for Removing the Freezer Drawer

Before we get into the step-by-step process, let’s briefly discuss why you might need to remove the freezer drawer:

  • Cleaning: Over time, the freezer drawer can accumulate ice and debris, affecting its efficiency.
  • Maintenance and Repair: If there’s a malfunction or parts need replacing, removing the drawer provides better access.
  • Defrosting: Although many modern refrigerators are frost-free, some circumstances might require manual defrosting.
  • Reorganization: Adjusting the compartment configuration for better space management.

Tools You’ll Need

Fortunately, removing the freezer drawer from a Kenmore Elite refrigerator doesn’t require any special tools. Here’s what you might need:

  • Screwdriver: For some models, you may need a Phillips head screwdriver to remove screws.
  • Towel or Soft Cloth: To protect your floor from scratches and to catch any drips when you remove the drawer.
  • Gloves (optional): To protect your hands from cold temperatures.

How to Remove the Freezer Drawer on an LG Refrigerator - iFixit Repair Guide


Step-by-Step Guide to Removing the Freezer Drawer

Step 1: Empty the Freezer

Before attempting to remove the drawer, ensure that all food items are removed. It’s easier and safer to work with an empty space. Plus, it prevents any items from being damaged during the process.

Step 2: Unplug the Refrigerator

Safety first! Always unplug the refrigerator from the electrical outlet to prevent any electrical hazards or shocks. This is especially important when you’re working with parts close to the appliance’s electrical system.

Step 3: Remove the Ice Bin (if applicable)

If your freezer has an ice maker, remove the ice bin first. This is usually straightforward; bins typically come out by lifting or pushing a release button.

Step 4: Detach the Drawer Slides

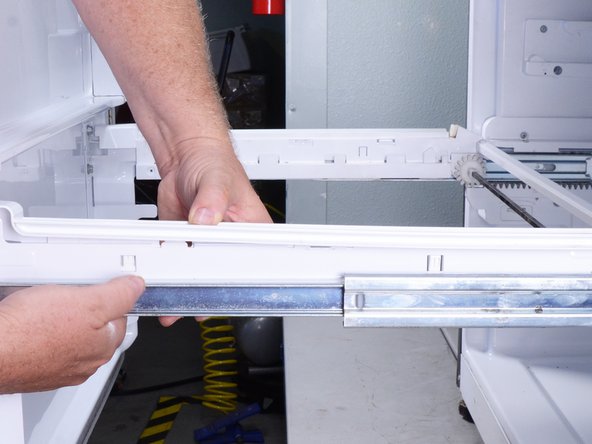
This step can vary slightly depending on your Kenmore Elite model. Look for screws or levers on the metal tracks (slides) that guide the drawer. If there are screws, use your screwdriver to remove them. If there are levers, typically, you’ll push them in one direction (check your manual for specifics) to release the drawer.

Step 5: Remove the Drawer

After the slides are detached, gently pull the drawer out. It might be heavy, so consider getting help if necessary. Be careful not to force it out; if it feels stuck, double-check if all screws are removed or if the drawer is properly disengaged from the slides.

Step 6: Clean and Inspect

With the drawer removed, it’s a good opportunity to wipe down the interior and inspect the area for any issues like ice buildup or debris. Use a soft cloth to clean surfaces.

Reinstalling the Freezer Drawer

To reinstall the drawer, simply reverse the above steps:

  1. Slide the drawer back into place: Carefully align the drawer with the tracks.
  2. Reattach to the slides: If you removed screws, replace them tightly. If your model uses levers, make sure they snap back into place securely.
  3. Replace the ice bin (if applicable).
  4. Plug the refrigerator back in.
  5. Restock your freezer.

Troubleshooting Common Issues

Sometimes, you might encounter issues when removing the freezer drawer. Here are a few tips:

  • Drawer won’t slide out: Check to ensure all screws are removed and that the levers are fully disengaged.
  • Misaligned tracks: If the drawer isn’t sitting right when you try to reinstall it, ensure the tracks aren’t bent or broken.
  • Ice buildup: If ice is preventing removal, you might need to defrost the freezer first.

Key Takeaways

  • Preparation is Key: Always empty and unplug the fridge before attempting to remove the drawer.
  • No Special Tools Needed: Generally, a screwdriver and a bit of elbow grease are all you need.
  • Safety First: Handling the drawer can be cumbersome; don’t hesitate to ask for help to avoid injury or damage.
  • Opportunity for Maintenance: With the drawer out, it’s a great time to clean and inspect the freezer.

Removing the freezer drawer from your Kenmore Elite refrigerator is a straightforward process, but always refer to your specific model’s manual for detailed instructions tailored to your appliance. Regular maintenance and cleaning can extend the life of your refrigerator and keep it running efficiently. For more helpful tips and guides on maintaining your kitchen appliances, keep followingTheKitchenApplianceDad.com.

Meet

Dale

Hi, I'm Dale! With over ten years in high volume restaurants, my journey has taken me through the ins and outs of using, maintaining, and even repairing virtually every kitchen appliance imaginable.

I'm here to share simple, straightforward advice to help you choose and use your kitchen tools effectively. No fluff, just the essential info you need to cook up a storm.