Welcome to another detailed guide from TheKitchenApplianceDad.com. Today, we’re diving into a practical task that many of you might face at home: removing the back panel from a Whirlpool refrigerator freezer. Whether you’re attempting to troubleshoot a problem, perform a repair, or simply give your appliance a deep clean, knowing how to safely remove the back panel of your refrigerator freezer is essential.
Whirlpool is a trusted name in home appliances, known for its durability and efficiency. However, like any appliance, it may occasionally require maintenance or repairs which might necessitate removing the back panel. It’s important to approach this task with care to avoid damaging the unit or voiding any warranties.

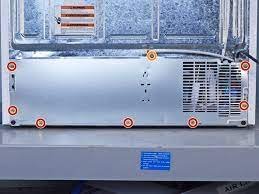
The back panel in a Whirlpool refrigerator freezer is usually located inside the freezer compartment. It may be at the back or bottom, depending on your model. It’s typically secured with screws and may have some components connected to it.
To get to the panel, you’ll need a clear workspace. Remove any shelves, bins, and other removable parts in the freezer. This will give you better visibility and access to the screws that hold the back panel in place.
In some models, there may be electrical connections or sensors attached to the panel. It’s crucial to carefully disconnect these elements to prevent any damage. If you’re unsure, refer to the owner’s manual for guidance, or check the manufacturer’s website for specific instructions related to your model.
Using the appropriate tool, begin to remove the screws that secure the back panel. Keep all screws in a safe place as you’ll need them to reattach the panel later. Make sure to support the panel as you remove the last screws to prevent it from falling.
Once all screws are removed, gently pull the panel off. It might require a bit of wiggling to free it from its position, especially if it hasn’t been removed in a while. Be cautious of any sharp edges and the evaporator coils that might be exposed once the panel is off.
With the back panel removed, you can now access the internals of your freezer. Whether you’re cleaning, checking for frost build-up, diagnosing a part, or replacing something, you have clear access.
After your maintenance or cleaning is complete, the reassembly process is essentially the reversal of removal:
By following these steps and tips, you can safely and effectively remove the back panel from your Whirlpool refrigerator freezer, allowing you to perform necessary maintenance or repairs. Remember, if at any point you feel unsure, it’s advisable to consult a professional. Keeping your Whirlpool appliance in top shape ensures it serves you well for many years. For more helpful guides, visit TheKitchenApplianceDad.com.