Welcome to TheKitchenApplianceDad.com! Today, we’re diving into a common yet sometimes challenging task for many homeowners: removing the back panel from a Whirlpool freezer. Whether you’re attempting to troubleshoot a problem or perform routine maintenance, understanding how to properly remove the back panel of your freezer is essential. Here’s a detailed guide to help you through the process safely and efficiently.
Before you begin, it’s crucial to prioritize your safety and the safety of your appliance:
Each Whirlpool freezer model might have slight variations in design and assembly. It’s a good idea to consult your specific model’s user manual for detailed instructions and diagrams. If you’ve misplaced your manual, you can usually find a digital copy by searching the model number online at the Whirlpool website.

Clear the area around your freezer to give yourself ample space to work. Remove any items inside the freezer if they obstruct access to the back panel.
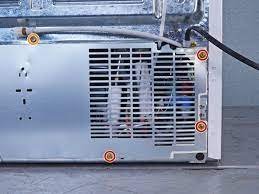
Inspect the back panel inside your freezer to locate all the screws. These are typically found around the perimeter of the panel. Using the appropriate screwdriver, remove each screw and keep them in a safe place so you won’t lose any.
Once all screws are removed, gently pull the panel away from the freezer. Some models might have clips or additional fasteners, so take care not to force the panel as this could bend or break it.
Be mindful of any wires attached to the panel. If your model has a fan or other components mounted on the back panel, disconnect the connectors carefully. It’s advisable to take a photo before you disconnect any wiring to serve as a reference for reassembly.
With the back panel removed, you now have access to various components like the evaporator coils, fan, and defrost heater. Perform your maintenance or troubleshooting as required.
After your maintenance is complete, reconnect any wiring and align the back panel back into place. Secure it with the previously removed screws and ensure it is fitted correctly without any gaps.
During the process, you might encounter a few common issues:
If you’re unsure about any part of the process or if you encounter complex issues like a refrigerant leak or electronic malfunctions, it’s wise to call in a professional technician. Handling complex refrigerator repairs can be risky and might void warranties or lead to further damage if not done correctly.
Removing the back panel from your Whirlpool freezer can seem daunting at first, but with the right tools and a bit of patience, it’s an achievable task. Remember, regular maintenance and timely troubleshooting can help extend the life of your freezer. Happy fixing, and stay tuned to TheKitchenApplianceDad.com for more handy tips and guides!# How To Remove The Back Panel From A Whirlpool Freezer
Welcome to TheKitchenApplianceDad.com! Today, we’re diving into a common yet sometimes challenging task for many homeowners: removing the back panel from a Whirlpool freezer. Whether you’re attempting to troubleshoot a problem or perform routine maintenance, understanding how to properly remove the back panel of your freezer is essential. Here’s a detailed guide to help you through the process safely and efficiently.