
Blenders are a staple in many kitchens, and Ninja is one of the most popular brands out there. A Ninja blender can be a fantastic asset for making smoothies, sauces, and a variety of blended concoctions. However, like any kitchen appliance, it requires regular cleaning to maintain its performance and longevity. At TheKitchenApplianceDad.com, we understand that taking apart your Ninja blender for a thorough cleaning might seem daunting. That’s why we’ve put together a step-by-step guide to help you get the job done right.
First and foremost, let’s discuss why it’s important to clean your Ninja blender properly. Over time, residue from blended ingredients can build up, potentially leading to bacteria growth and unpleasant odors. Additionally, leftover particles can dull the blades, making your blender less efficient. By taking apart your blender and cleaning it thoroughly, you ensure it remains a hygienic and effective tool in your culinary arsenal.
Before you start disassembling your Ninja blender for cleaning, safety must be your top priority. Always unplug the blender from the electrical outlet to prevent any accidental activation. Also, handle the blades with care, as they are extremely sharp and can cause injury if not handled properly.
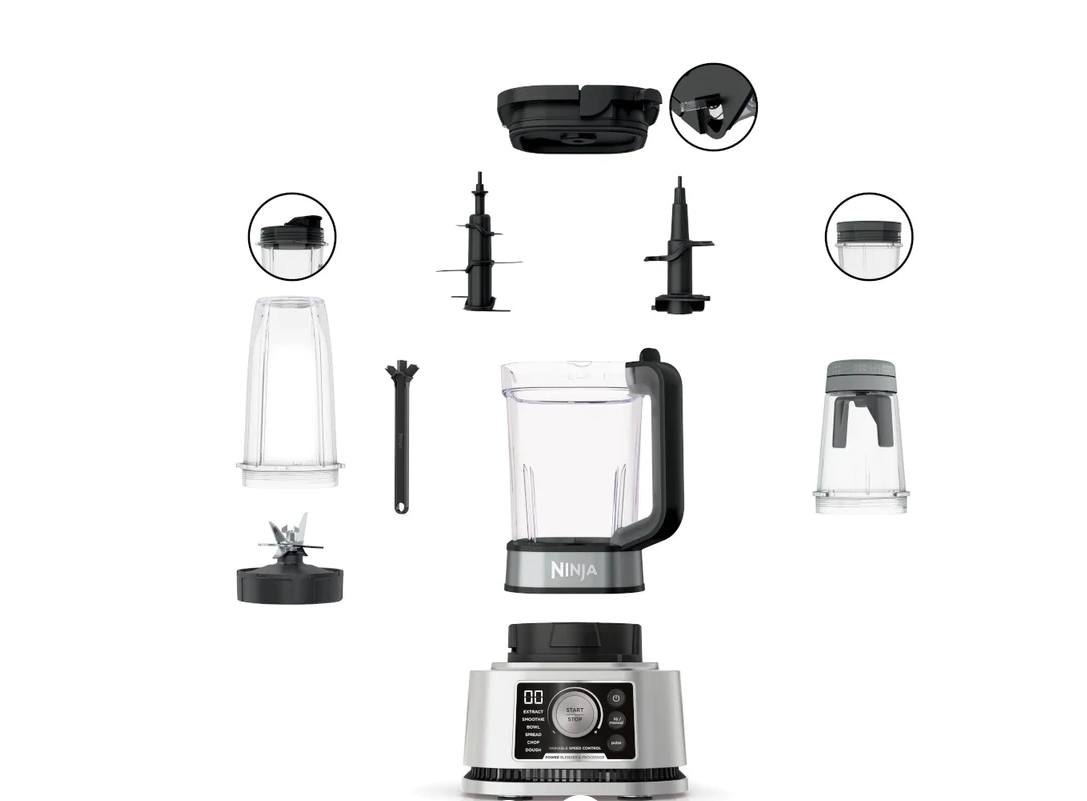
Start by taking off the pitcher from the motor base. Most Ninja blenders have a pitcher that simply lifts off the base without any twisting or locking mechanisms.
With the pitcher off the base, you can now remove the blade assembly. Depending on your Ninja blender model, the blade assembly may screw off or simply pull out of the pitcher. Consult your blender’s manual if you’re unsure how to detach the blade assembly safely.
Next, remove the lid from the pitcher. Make sure to take apart any additional components, such as the locking handle or pour spout, if your model includes them. Some Ninja blenders also come with a rubber gasket or seal that sits between the blade assembly and the pitcher—remove this as well.
The pitcher of your Ninja blender is usually dishwasher safe on the top rack. However, if you prefer to hand-wash it, use warm soapy water and a soft sponge or cloth to clean the inside and outside thoroughly. Avoid using abrasive sponges or cleaners that can scratch the surface.
The blade assembly should be hand-washed as it contains the sharp blades. Use a dish brush and soapy water to carefully clean between the blades. Never put your fingers directly on the blades. After washing, rinse thoroughly and allow it to dry completely.
Wash the lid and any rubber seals or gaskets separately, as food particles can often hide in the nooks and crannies. Again, use warm soapy water and a sponge or cloth. For hard-to-reach areas, a small brush, like an old toothbrush, can be handy.
The motor base should never be submerged in water. Instead, wipe it down with a damp cloth to remove any spills or residue. You can use a mild cleaner if necessary, but make sure to avoid any openings or electronic components.
Once all the parts are clean and dry, it’s time to put your Ninja blender back together. Follow these steps in reverse order, ensuring that each component is properly aligned and securely fastened.
After reassembling your Ninja blender, it’s a good idea to test it to ensure everything is working correctly. Add some water to the pitcher and run the blender for a short cycle. Check for any leaks or unusual noises. If you spot any issues, unplug the blender and double-check the assembly to make sure all parts are correctly installed.
Keeping your Ninja blender clean is crucial for its performance and the safety of the food you prepare with it. By following these steps, you can ensure that your Ninja blender remains a reliable kitchen companion for years to come. Remember to handle the blades with care and consult your manual for any model-specific instructions. With regular maintenance and proper cleaning, your Ninja blender will continue to make those perfect smoothies and sauces, just as it did when it was brand new.
By keeping these key points in mind, you’ll be able to take apart, clean, and reassemble your Ninja blender with confidence. Happy blending, and remember to keep checking back at TheKitchenApplianceDad.com for more tips, tricks, and advice on getting the most out of your kitchen appliances!

