level-a-whirlpool-refrigerator

How To Level A Whirlpool Refrigerator

At TheKitchenApplianceDad.com, we understand that a well-leveled refrigerator is crucial not only for optimal performance but also for extending the life of your appliance. A Whirlpool refrigerator, much like any other brand, may require leveling from time to time, especially after installation or when it seems off-balance. Today, we will guide you through the steps on how to properly level your Whirlpool refrigerator to ensure it operates efficiently and maintains its longevity.

Why Leveling Your Refrigerator is Important

Leveling your refrigerator is more important than it might seem. If a refrigerator isn’t properly leveled, it can lead to several issues:

  • Inefficient Cooling: An unlevel refrigerator can cause uneven cooling and longer running times.
  • Improper Door Alignment: This can lead to air leaks, which increase energy consumption and cause your fridge to work harder than necessary.
  • Increased Wear and Tear: When the appliance is tilted, it can put extra stress on components like the compressor, potentially shortening the lifespan of your refrigerator.

Tools and Materials Needed

Before you begin the leveling process, make sure you have the following tools and materials handy:

  • A bubble level
  • An adjustable wrench or a suitable socket wrench
  • A flashlight (if needed for better visibility)

Fridge leveling and taking weight off wheels - YouTube

Step-by-Step Guide to Leveling Your Whirlpool Refrigerator

Step 1: Prepare Your Work Area

First, ensure that your refrigerator is empty or at least not overly full, as you might need to tilt or move it slightly. Pull the refrigerator away from the wall carefully to avoid damaging the water line (if your model has an ice maker or water dispenser).

Step 2: Check the Current Level

Place your bubble level on top of the refrigerator in the middle. Check both the side-to-side and front-to-back readings. Note which side needs raising or lowering.

Step 3: Adjust the Legs or Wheels

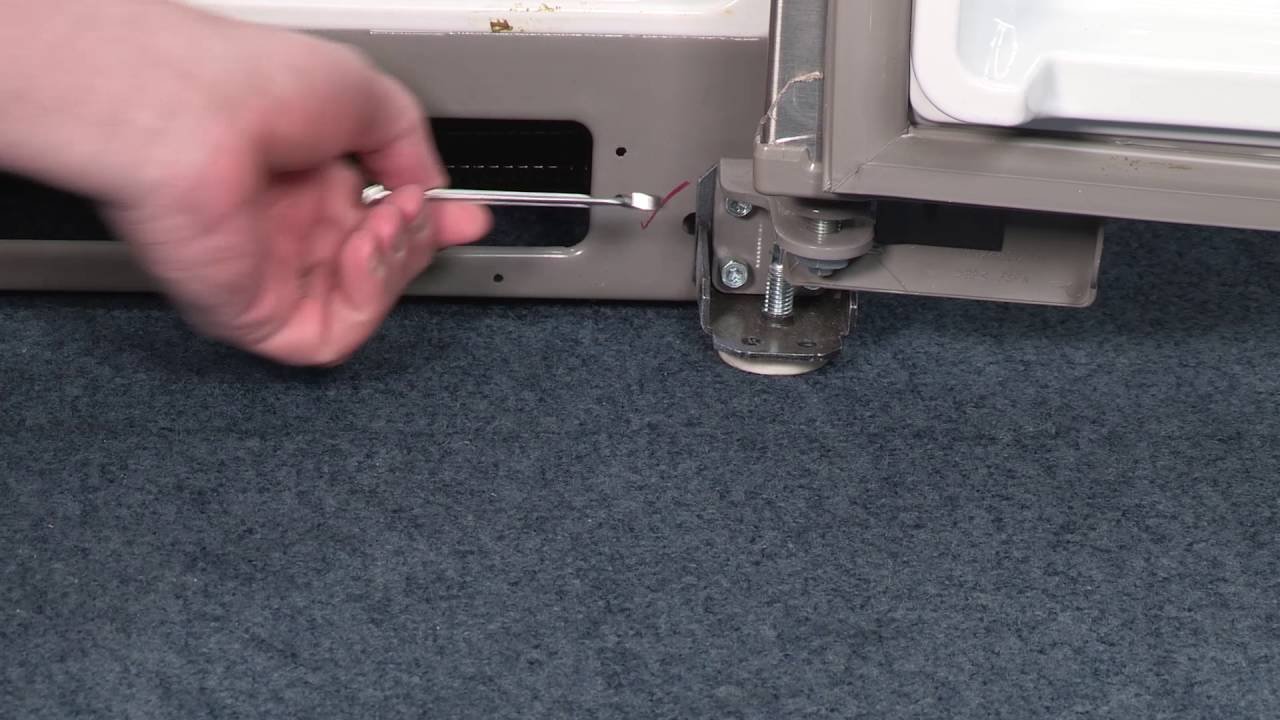
Most Whirlpool refrigerators come with adjustable legs or wheels. These can typically be found at the front bottom corners of the appliance.

  • For Legs: Use your adjustable wrench to turn the legs. Right turns (clockwise) will raise that side of the refrigerator, and left turns (counterclockwise) will lower it.
  • For Wheels: Some models have a screw mechanism to adjust the wheels. Turn the screw clockwise to raise and counterclockwise to lower the fridge. You might need someone to slightly lift the refrigerator using a safe lifting technique to take the weight off the wheels while adjusting.

Step 4: Re-check Level

After making the adjustments, place the level back on top of the refrigerator to check both axes again. Adjust further if necessary until the bubbles on the level are centered.

Step 5: Secure the Refrigerator

Once the refrigerator is perfectly level, gently push it back towards the wall. Be careful not to exert too much force, as this could unsettle the leveling you just perfected. Make sure to leave enough space between the wall and the refrigerator for air circulation.

Step 6: Monitor the Refrigerator

In the days following your adjustment, keep an eye on the refrigerator’s performance. Check if the doors are closing properly and if the cooling is consistent in all parts of the refrigerator. Sometimes, a newly leveled fridge might need minor readjustments as it settles into position.

Additional Tips

  • Do Not Overload: Avoid overloading the doors of your refrigerator with heavy items, as this can cause the doors to sag and lose alignment over time.
  • Regular Checks: Make leveling a part of your regular appliance maintenance. Checking once or twice a year is generally sufficient unless you notice issues sooner.
  • Use the Right Tools: Always use the correct size wrench or socket to adjust the legs or wheels to prevent damage.

Conclusion

Leveling your Whirlpool refrigerator is a straightforward process that can significantly enhance its efficiency and lifespan. By following these steps, you can ensure that your refrigerator operates at its best, providing safe and efficient storage for your food items.

Key Takeaways

  • Importance of Leveling: Keeps your fridge running efficiently, prevents unnecessary wear and tear, and ensures proper door function.
  • Tools Needed: Bubble level, adjustable wrench or socket wrench, and possibly a flashlight.
  • Steps to Level: Prepare the area, check the level, adjust legs or wheels, re-check, secure the refrigerator, and monitor performance.
  • Maintenance: Regular leveling checks are part of good appliance maintenance.

Remember, a little care and maintenance can go a long way in extending the life of your appliances. Happy leveling from all of us at TheKitchenApplianceDad.com!

Meet

Dale

Hi, I'm Dale! With over ten years in high volume restaurants, my journey has taken me through the ins and outs of using, maintaining, and even repairing virtually every kitchen appliance imaginable.

I'm here to share simple, straightforward advice to help you choose and use your kitchen tools effectively. No fluff, just the essential info you need to cook up a storm.