When it comes to preparing ground meat, there’s something satisfying about doing it at home. You get the freshest outcome, and you can customize your blend to suit your palate. For home chefs looking to elevate their culinary prowess, a KitchenAid meat grinder attachment is an invaluable tool. In this comprehensive guide, we at TheKitchenApplianceDad.com will walk you through the steps to master the use of your KitchenAid meat grinder, ensuring you can tackle any recipe that calls for ground meat.
Understanding Your KitchenAid Meat Grinder
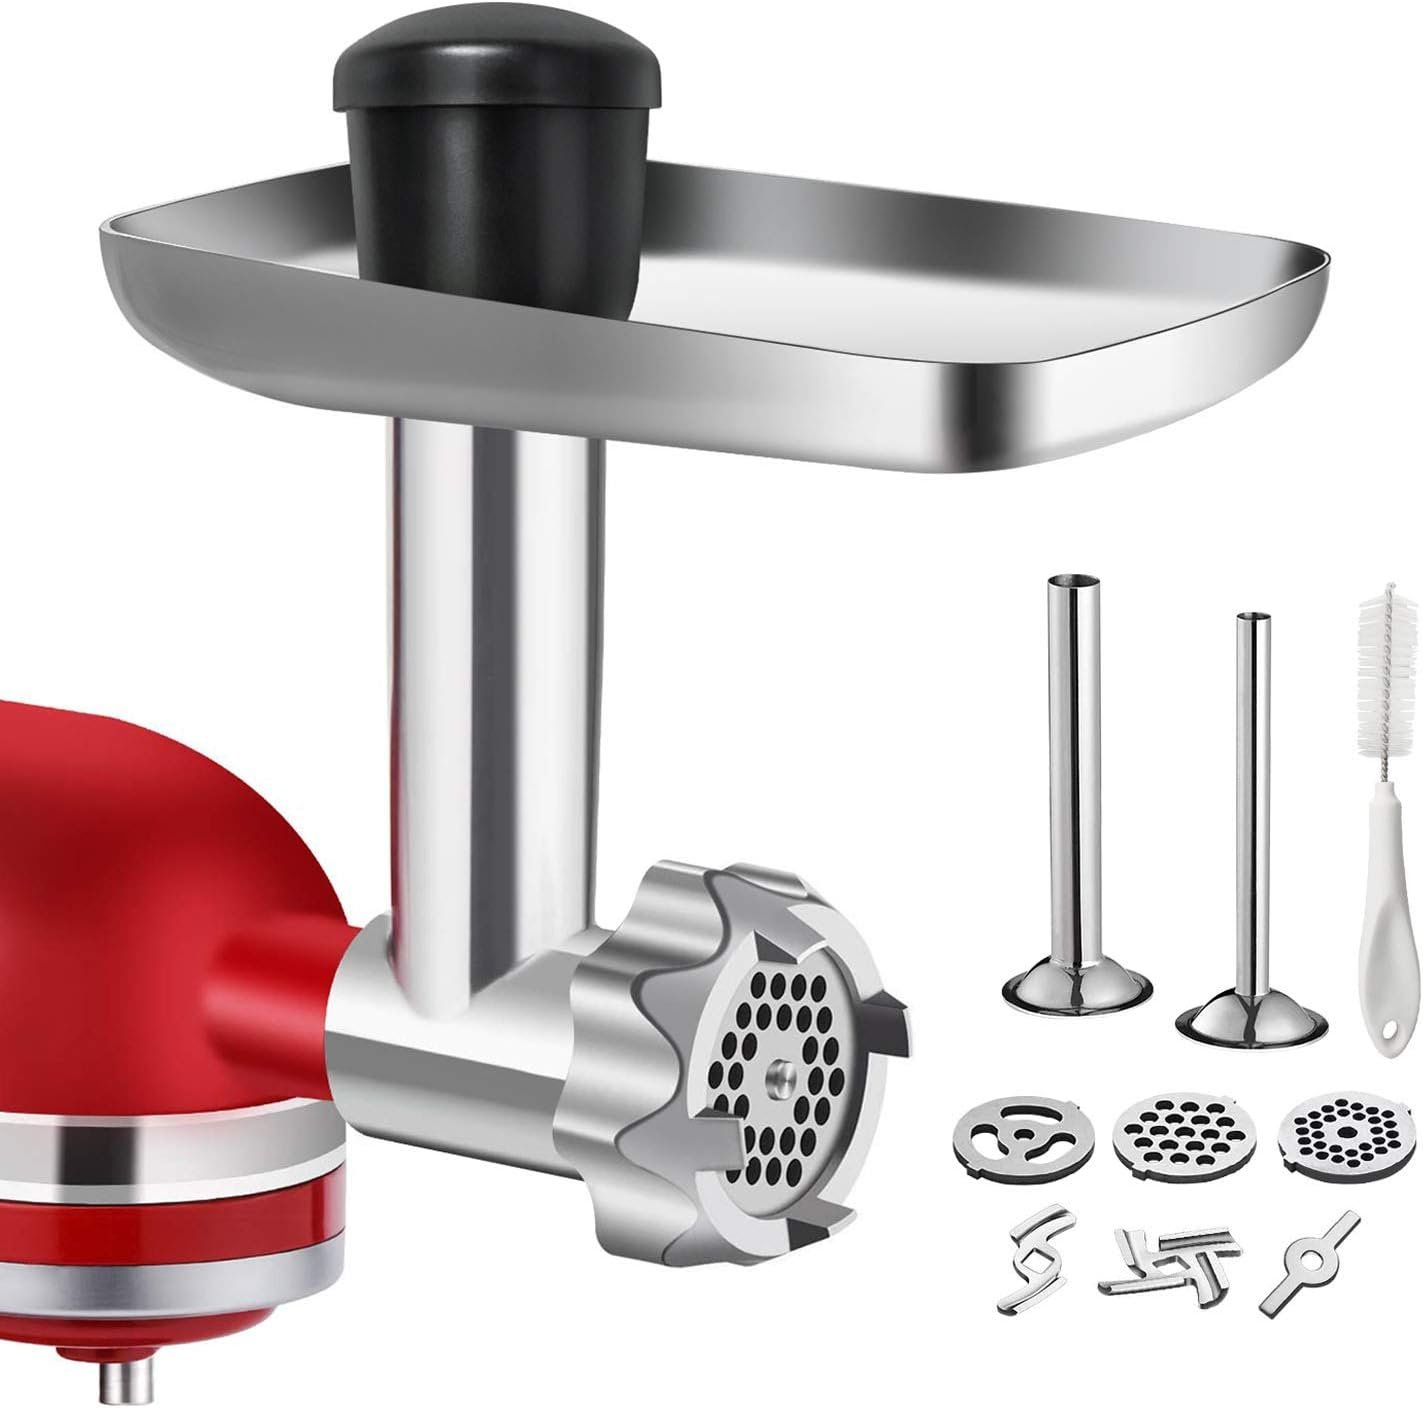
Before diving into the grinding process, it’s essential to familiarize yourself with the parts of your KitchenAid meat grinder. The attachment typically comes with the following components:
- Grinder Body: The main part that attaches to your KitchenAid mixer.
- Screw Conveyor: The worm-shaped piece that pushes the meat through the grinder.
- Blade: The sharp, cross-shaped piece that cuts the meat.
- Grinding Plates: Circular disks with holes that determine the coarseness of the grind.
- Locking Ring: Secures the blade and grinding plate in place.
- Food Pusher: A tool to safely push the meat into the grinder.

Preparing the Meat
For optimal grinding, your meat should be cold. This means partially freezing the meat for about 30 minutes before grinding. This step prevents the fat from smearing and ensures a clean grind. Cut the meat into cubes or strips that will easily fit into the grinder’s feeding tube.
Selecting Your Grinding Plate
The KitchenAid meat grinder comes with different grinding plates for various textures:
- Fine Plate: Ideal for spreads, burgers, or for finely ground meat.
- Medium Plate: The most versatile, perfect for sausages or ground meat that has some texture.
- Coarse Plate: Great for chunkier grinds or for recipes that call for a more rustic texture.
Choose the plate that best suits your recipe and attach it to the grinder.
Assembly and Attachment
Step 1: Assemble the Grinder
- Place the blade onto the screw conveyor, ensuring the flat side faces out.
- Attach the grinding plate over the blade.
- Secure the parts by screwing the locking ring onto the grinder body. Make sure it is tight, but do not overtighten as it may be difficult to remove after use.
Step 2: Attach to Your KitchenAid Mixer
- Remove the hub cover or cap from the front of your KitchenAid stand mixer.
- Insert the grinder attachment into the hub, aligning the pins with the notches.
- Tighten the attachment knob by turning it clockwise to secure the grinder.
The Grinding Process
Step 3: Begin Grinding
- Turn the mixer to speed 4 or 6, as higher speeds can heat the meat.
- Feed the chilled meat into the hopper and gently push it down with the food pusher.
- As the meat starts to flow through, have a bowl or tray ready to catch the ground meat.
Step 4: Grind in Batches
- Work in small batches to prevent overloading the grinder.
- If you’re grinding multiple types of meat for a blend, alternate between them to achieve an even mix.
Step 5: Second Grind (Optional)
- For a finer texture, pass the meat through the grinder a second time using the same or a finer grinding plate.
Tips for Success
- Chill Well: Keep the meat and the grinder attachment in the freezer for a short while before grinding.
- No Bones: Ensure there are no bones in the meat, as these can damage the grinder.
- Clean As You Go: After each batch, check to see if sinew is clogging the blade. If so, disassemble, clean, and reassemble the grinder.
- Keep It Dry: Pat the meat dry before grinding to prevent mushiness and facilitate a cleaner grind.
- Sharp Blades: Keep the blades sharp for efficient grinding. If you notice the meat is not being cut cleanly, it might be time to replace the blade.
Cleaning and Maintenance
After you’ve finished grinding, it’s crucial to clean the grinder immediately to prevent any meat residue from hardening, which makes it more difficult to clean.
Step 6: Disassemble and Clean
- Disassemble the meat grinder.
- Rinse each piece under warm water to remove meat particles.
- Use a mild detergent and a soft brush or sponge to wash each part, paying special attention to the blade and grinding plates.
Step 7: Dry and Reassemble
- Dry each piece thoroughly to prevent rusting.
- Reassemble the grinder without the blade and plate for storage.
Storing Your Grinder
Store the clean and dry attachment in a dry place. The KitchenAid meat grinder does not come with its own storage case, but you can use asmall appliance bag or a dedicated drawer. Keep the blades and plates separate to avoid dulling the edges.
Troubleshooting Common Issues
Even with proper use, you might encounter some issues. Here are quick fixes for common problems:
- Meat Not Grinding Properly: Make sure the blade is facing the right direction, and the meat is adequately chilled.
- Grinder Getting Clogged: Check for sinew or fat build-up and clean as needed.
- Grinder Attachment Shaking: Ensure it is firmly attached to the mixer and that the locking ring is tight.
By following these guidelines, you should have a smooth grinding experience.
Creative Uses for Your KitchenAid Meat Grinder
Beyond grinding meat, your KitchenAid meat grinder can be used for a variety of tasks:
- Homemade Sausages: Experiment with different meat blends and seasonings to make custom sausages.
- Breadcrumbs: Grind stale bread for fresh breadcrumbs.
- Grated Vegetables: Use the coarse grinding plate for grating vegetables for relishes or coleslaw.
- Baby Food: Create purees from cooked vegetables and fruits.
The versatility of the KitchenAid meat grinder attachment makes it an essential tool for anyone who loves to cook from scratch and experiment with flavors.
Key Takeaways
Here’s a summary of the key points to remember when using your KitchenAid meat grinder:
- Pre-Chill Your Meat: Partially freeze the meat for cleaner grinding.
- Assemble Correctly: Ensure the blade is facing out and the grinding plate matches your desired texture.
- Grind at a Medium Speed: Use speed 4 or 6 to prevent heating the meat.
- Clean Immediately: Wash and dry each part after use to maintain the grinder.
- Store Properly: Keep the attachment in a dry place, with blades and plates stored separately.
With this complete tutorial, you’re now equipped to use your KitchenAid meat grinder like a pro. From grinding meat for the perfect burger to creating your own sausage blends, there’s no limit to the culinary delights you can achieve. Happy grinding, and remember, for more kitchen appliance wisdom, keep visiting us at TheKitchenApplianceDad.com.