Welcome to another detailed guide from TheKitchenApplianceDad.com. Today, we’ll be delving into a very practical topic that many of you might find essential—how to install a new fan in a Whirlpool freezer and how to test it. A properly functioning fan is crucial for maintaining the correct temperature and air circulation in your freezer. Whether you’re dealing with a noisy fan, one that’s stopped working, or you’re simply doing a preemptive replacement, this guide will help you get the job done right.
Before we dive into the installation process, it’s important to understand exactly what the fan does in your freezer. The fan in a Whirlpool freezer is primarily responsible for circulating cold air throughout the compartment, ensuring that the temperature is uniform and that all stored items remain properly frozen. If the fan fails, you might notice uneven cooling, ice buildup, or a significant increase in your freezer’s internal temperature.

To replace the fan in your Whirlpool freezer, you will need the following tools and materials:
Make sure to purchase a replacement fan that matches the model number of your freezer. This information can usually be found in your freezer’s manual or on a label inside the appliance.
Safety first! Always unplug the appliance before performing any repairs. This protects you from any electrical hazards.
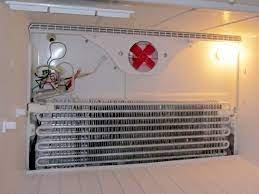
Remove the shelves and bins to clear your workspace. Locate the panel that covers the fan—this is usually at the back of the freezer compartment. Use a screwdriver to remove the screws holding the panel in place.
Once you have access, you will see the fan held by screws or clips. Carefully remove these and disconnect the fan from its power supply. Take note of how the fan is installed, which will help you when installing the new one.
Position the new fan in the same orientation as the old one. Secure it with screws or clips, and connect it to the power supply. Ensure everything is tight and correctly placed.
Replace the back panel and secure it with screws. Put back the shelves and bins.
After everything is assembled, plug the freezer back in. It’s recommended to wait a few minutes before turning it on to let the internal system stabilize.
Once your new fan is installed, you need to ensure it’s working correctly. Here’s how to test the fan:
Power up your freezer and set it to your desired temperature. Listen for the fan; it should start running shortly after the compressor kicks in.
If you don’t hear the fan, you can use a multimeter to test the voltage output where the fan connects. Ensure it matches the specifications required by the fan. This process might require technical knowledge, so refer to your freezer’s manual or seek professional help if needed.
Feel for air movement in the freezer. The air should feel cold and be circulating well, indicating that the fan is functioning properly.
Over the next 24 hours, keep an eye on the freezer’s temperature. It should stabilize at the set temperature. Any fluctuations could indicate a problem with the fan or another component of the freezer.
By following these detailed steps, you should be able to successfully install a new fan in your Whirlpool freezer and ensure it’s functioning as expected. Remember, if you ever feel unsure about performing repairs yourself, it’s wise to consult with or hire a professional technician. For more helpful guides and tips on maintaining your kitchen appliances, keep visiting us here at TheKitchenApplianceDad.com.## Introduction
Welcome to another detailed guide from TheKitchenApplianceDad.com. Today, we’ll be delving into a very practical topic that many of you might find essential—how to install a new fan in a Whirlpool freezer and how to test it. A properly functioning fan is crucial for maintaining the correct temperature and air circulation in your freezer. Whether you’re dealing with a noisy fan, one that’s stopped working, or you’re simply doing a preemptive replacement, this guide will help you get the job done right.