
Welcome to TheKitchenApplianceDad.com, your go-to resource for all things related to kitchen appliances. Today, we’re focusing on a common feature in every kitchen with a microwave: setting the clock. Specifically, we’ll be looking at how to set the clock on a Whirlpool microwave. Whether you’ve just purchased a new microwave, experienced a power outage, or daylight savings time has rolled around again, this guide will help you get your Whirlpool microwave displaying the correct time in no time.
Whirlpool microwaves come in various models, each with unique features and settings. However, the process for setting the clock is generally consistent across most models. Before we dive into the steps, it’s important to familiarize yourself with your microwave’s control panel. You’ll typically find a ‘Clock’ or ‘Set Clock’ button, numeric keypad, and sometimes a ‘Start’ or ‘Enter’ button.
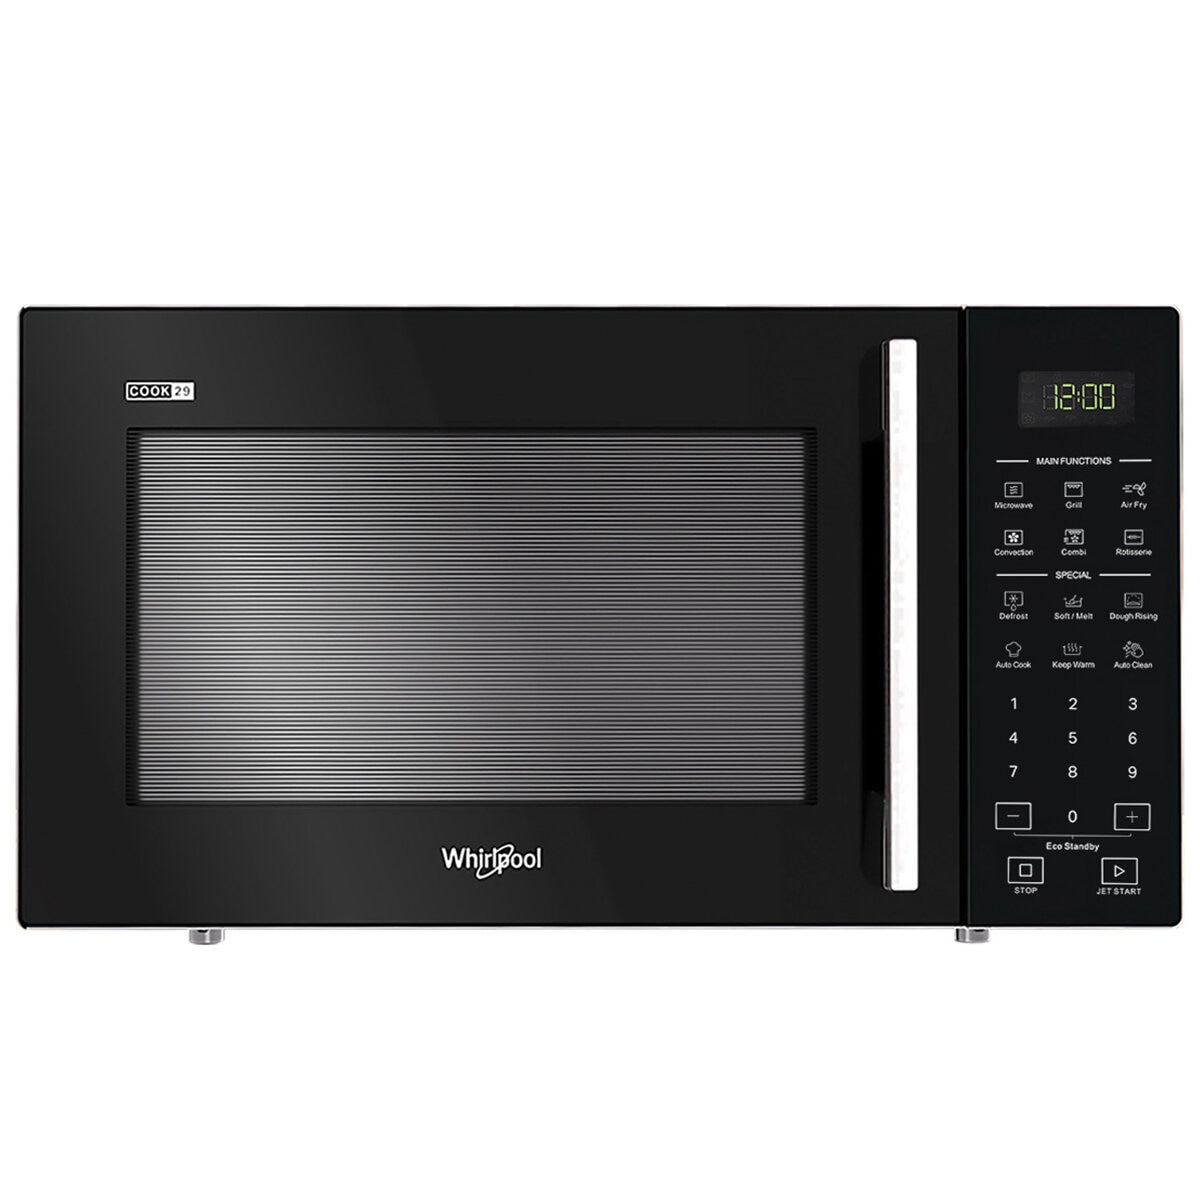
First, locate the ‘Clock’ or ‘Set Clock’ button on your microwave’s control panel. This button is crucial for initiating the time-setting mode. If you can’t find a designated clock button, refer to your microwave’s user manual, which can usually be found online by searching for your specific model number.
Once you’ve located the ‘Clock’ or ‘Set Clock’ button, press it. Depending on your Whirlpool model, you might need to press this button once or hold it down for a few seconds. Some models may require you to press it in conjunction with another button, such as ‘Cancel’ or ‘Off.’
After pressing the ‘Clock’ or ‘Set Clock’ button, the display should blink or show a default time, indicating that it’s ready for you to set the time. Using the numeric keypad, enter the current hour. Make sure to input the time based on your microwave’s clock format (12-hour or 24-hour). For example, if it’s 3 PM and your microwave uses a 12-hour format, you would press ‘3’ and ‘0’ for ’03.’
Following the hours, you’ll need to input the current minutes. Continuing from our previous example, if it’s 3:15 PM, after entering ’03’ for the hour, you would press ‘1’ and ‘5’ for the minutes.
If your Whirlpool microwave uses a 12-hour clock format, you’ll need to set whether it’s AM or PM. Usually, there’s an ‘AM/PM’ button you can press to toggle between the two. If your microwave operates on a 24-hour clock, you can skip this step.
After setting the correct hour and minutes (and AM/PM if necessary), it’s time to lock in the time. Look for the ‘Start,’ ‘Enter,’ or ‘Clock’ button (again, this can vary by model) and press it to confirm the time you’ve entered. Some models may automatically save the time once you’ve finished entering the minutes.
If your microwave doesn’t respond to the ‘Clock’ or ‘Set Clock’ button, try disconnecting it from power for a minute and then plugging it back in. This can reset the system and may resolve any temporary glitches.
It’s common for the clock to reset after a power outage. If this happens frequently, consider investing in an uninterruptible power supply (UPS) for your microwave to maintain the time settings during brief power interruptions.
If you notice that the clock on your microwave drifts or becomes inaccurate over time, it might indicate an internal issue. In this case, reach out to Whirlpool customer support for assistance or consider having a professional look at the appliance.
If you encounter any model-specific issues or your microwave has a unique control setup, the user manual is your best resource. It will provide detailed instructions tailored to your particular Whirlpool microwave model.
Some modern Whirlpool microwaves come with touchscreen panels. For these models, you’d typically touch the ‘Clock’ area on the display to start the time-setting process, then use the on-screen keypad to enter the time.
Whirlpool’s smart microwaves might allow you to set the time via an app. If you own one of these models, download the Whirlpool app, connect your microwave to your Wi-Fi network, and follow the in-app instructions to set theclock.
Remember, while setting the clock on your Whirlpool microwave is a simple task, it’s an important one that ensures your kitchen runs like clockwork. For more tips and guides on managing your kitchen appliances, keep visiting us here at TheKitchenApplianceDad.com, where we’re always ready to lend a helping hand in the kitchen.

