how-to-set-the-clock-on-a-hamilton-beach-1000-watt-microwave-oven

How to Set The Clock on A Hamilton Beach 1000 Watt Microwave Oven

Setting the clock on your microwave isn’t just about keeping time while you cook. It’s about integrating this essential kitchen appliance into the daily rhythm of your kitchen. Today, at TheKitchenApplianceDad.com, we’re focusing on a common but sometimes overlooked task: setting the clock on the Hamilton Beach 1000 Watt Microwave Oven. This guide will ensure that you can efficiently manage this function and make the most out of your microwave oven.

Understanding Your Hamilton Beach 1000 Watt Microwave Oven

The Hamilton Beach 1000 Watt Microwave Oven is known for its reliability and efficiency in the kitchen. Before we dive into the specifics of setting the clock, let’s briefly discuss what makes this microwave a popular choice:

  • Power: As the name suggests, it operates at 1000 watts, which allows for quick and even cooking.
  • Capacity: It typically has about 1.1 to 1.6 cubic feet of interior space, making it suitable for most family needs.
  • Features: Besides basic microwaving, it often comes with additional features such as pre-programmed settings, defrost modes, and a kitchen timer.

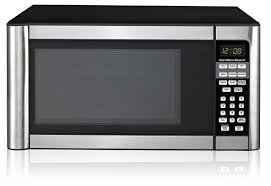
Amazon.com: 1.1 cu. ft. 1000 W Mid Size Microwave Oven, 1000W, Black  Stainless Steel, 20.60 x 16.50 x 11.80 Inches : Home & Kitchen

Step-by-Step Guide to Setting the Clock

Step 1: Plug In Your Microwave

Ensure that your Hamilton Beach microwave is plugged into a working electrical outlet. This might seem obvious, but it’s a fundamental step that needs confirmation, especially if the microwave is new or has been moved recently.

Step 2: Locate the ‘Clock’ Button

On your Hamilton Beach microwave, look for the button labeled ‘Clock’ or ‘Clock Set’. The placement of this button can vary slightly depending on the model, but it is typically found on the control panel.

Step 3: Enter the Time

After pressing the ‘Clock’ button, enter the time by typing in the numbers. For instance, if the current time is 2:30, you would press the buttons ‘2’, ‘3’, ‘0’. On some models, you might need to press the ‘AM/PM’ button to choose between morning or evening.

Step 4: Confirm the Time

Once the correct time is displayed on the microwave’s screen, you typically need to press ‘Start’ or ‘Clock’ again to set it. Some models might require you to press ‘Enter’ or ‘OK’. It’s important to finalize the setup, or the time might revert to its previous state.

Step 5: Check for Accuracy

After setting the clock, it’s a good idea to wait a minute or two to ensure that the time starts advancing correctly. If it doesn’t, repeat the steps, ensuring that each button press is registered by the microwave.

Troubleshooting Common Issues

Sometimes, setting the clock can be frustrating if things don’t go as planned. Here are some troubleshooting tips:

  • Microwave Not Responding: Ensure the microwave is plugged in and that the outlet is functioning. You might want to try plugging another appliance into the same outlet to test it.
  • Time Not Advancing: If the clock isn’t moving, there might be a problem with the microwave’s internal electronics. In such cases, consulting the user manual or contacting Hamilton Beach customer support can be helpful.
  • Buttons Not Working: If some buttons respond but others don’t, the control panel might be locked or the microwave could need a reset. Unplugging the unit for about a minute and then plugging it back in can resolve many electronic issues.

Maintaining Your Microwave

While setting the clock is a relatively simple task, proper maintenance of your Hamilton Beach microwave will ensure it operates efficiently for years to come. Here are a few maintenance tips:

  • Keep it Clean: Regularly clean the interior and the door seal to prevent food particles from building up and causing odors or smoke.
  • Turntable Maintenance: Ensure the turntable is correctly seated and clean it periodically to prevent uneven cooking.
  • Avoid Metal: Never use metal containers or aluminum foil in the microwave, as they can cause sparks and damage the appliance.

Key Takeaways

  • Locate the ‘Clock’ Button: Find and press the ‘Clock’ or ‘Clock Set’ button on the control panel.
  • Enter Correct Time: Use the numerical keypad to enter the current time and confirm by pressing ‘Start’ or ‘Clock’ again.
  • Check Functionality: Ensure the clock starts to advance to confirm it’s set correctly.
  • Troubleshoot if Necessary: If the clock isn’t setting, ensure the microwave is powered and functioning correctly, or try resetting it.
  • Maintain Regularly: Keep your microwave clean and well-maintained for optimal performance.

Setting the clock on your Hamilton Beach 1000 Watt Microwave Oven is straightforward with these steps. Not only does it help in better managing cooking times, but it also integrates your microwave into the daily flow of your kitchen activities. For more tips on how to maximize the use of your kitchen appliances, keep following TheKitchenApplianceDad.com. Happy cooking and efficient time managing with your Hamilton Beach microwave!
Meet

Dale

Hi, I'm Dale! With over ten years in high volume restaurants, my journey has taken me through the ins and outs of using, maintaining, and even repairing virtually every kitchen appliance imaginable.

I'm here to share simple, straightforward advice to help you choose and use your kitchen tools effectively. No fluff, just the essential info you need to cook up a storm.