Moving a large appliance such as an upright freezer can be a daunting task. These units are not only heavy and bulky but also require careful handling to ensure they remain in good working condition. Whether you’re relocating to a new home or simply moving the freezer to another spot, it’s important to follow certain precautions to avoid damage. At TheKitchenApplianceDad.com, we understand the challenges and are here to offer detailed guidance on how to transport your upright freezer safely.
Secure Internal Components
Before you start moving the freezer, make sure to secure all internal components. Remove any shelves, drawers, and ice trays. These items can be packed separately to prevent damage and also make the freezer lighter and easier to transport.

Defrost and Clean
Defrost the freezer at least 24-48 hours before the move. This prevents water damage and mold growth during transportation. After defrosting, thoroughly clean the interior with a mild detergent or baking soda solution to remove any food residue and odors.
Dry Thoroughly
Ensure that the freezer is completely dry before moving. This reduces the risk of mildew and mold developing if the freezer is going to be in transit or storage for a while.
Measure Doorways and Paths
Measure all doorways, staircases, and paths the freezer must go through to reach its new location. This ensures that there are no surprises on moving day. If the freezer needs to be tilted to fit through any areas, plan how to do this safely without causing damage.
Hire Professional Movers
If possible, hire professional movers who have experience with large appliances. They will have the necessary equipment and expertise to move your freezer safely. Check reviews and ensure they are insured and reputable.
Gather Moving Supplies
If you decide to move the freezer yourself, you’ll need the following supplies:
Disconnect and Secure the Door
Unplug the freezer and secure the power cord with tape to the back of the unit. Ensure the freezer door is closed and tape it shut to prevent it from opening during the move.
Protect the Freezer
Wrap the freezer in moving blankets to protect it from any bumps and scratches during the move. Secure the blankets with tape so they don’t come loose.
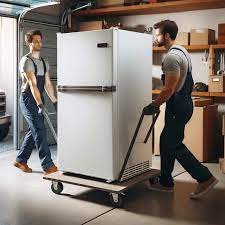
Use a Dolly
Slide the freezer onto a dolly. Tilt the freezer slightly to slide the dolly underneath, but be careful not to tilt it too much as this can cause damage. Secure the freezer to the dolly with straps to prevent it from sliding off.
Move With Caution
Move slowly and steadily. Use a ramp to navigate any stairs or to load the freezer into a moving truck. Always push from the bottom rather than pulling from the top to reduce the risk of the freezer tipping over.
Let it Sit
Once the freezer is in its new location, do not plug it in immediately. Let it sit for at least a few hours, ideally 24 hours if it was transported on its side. This allows the oil in the compressor to settle, preventing damage when the freezer is turned back on.
Reinstall Components
Reinstall any shelves, drawers, and ice trays that were removed for the move.
Check Operation
Plug in the freezer and check its operation. Make sure it’s cooling properly and that there are no unusual noises.
Following these detailed steps from TheKitchenApplianceDad.com will help ensure that your upright freezer is moved safely and is ready to function perfectly in its new home. Remember, taking the time to prepare and move your freezer correctly can save you from costly repairs or replacements. Happy moving!