how-to-replace-the-seal-on-your-kenmore-freezer-and-why-its-important

How To Replace The Seal On Your Kenmore Freezer And Why It’s Important

When it comes to maintaining your Kenmore freezer, one of the most crucial components to keep an eye on is the door seal. A faulty or worn-out seal can lead to a host of issues, ranging from increased energy consumption to reduced efficiency of your appliance. In this detailed guide from TheKitchenApplianceDad.com, we will walk through the steps on how to replace the seal on your Kenmore freezer and discuss why it’s so important to ensure it’s in good working condition.

Understanding the Importance of a Good Freezer Seal

Energy Efficiency:
A tight and intact freezer seal helps maintain the internal temperature without forcing the appliance to work harder. This efficiency not only ensures your food stays frozen and preserved but also reduces the amount of energy consumed, leading to lower electricity bills.

Prevent Frost Build-up:
A compromised seal can allow warm air to enter the freezer, leading to excessive frost build-up. This not only makes your freezer work harder but can also shorten the lifespan of its components.

Maintain Food Quality:
An effective seal helps keep the air inside your freezer stable, which is crucial for maintaining the quality and nutritional value of the stored food. Fluctuating temperatures can cause freezer burn and spoilage.

Amazon.com: ClimaTek Refrigerator Door Gasket Seal fits GE Kenmore WR24X445  AP2067918 300595 : Appliances

Tools and Materials Needed

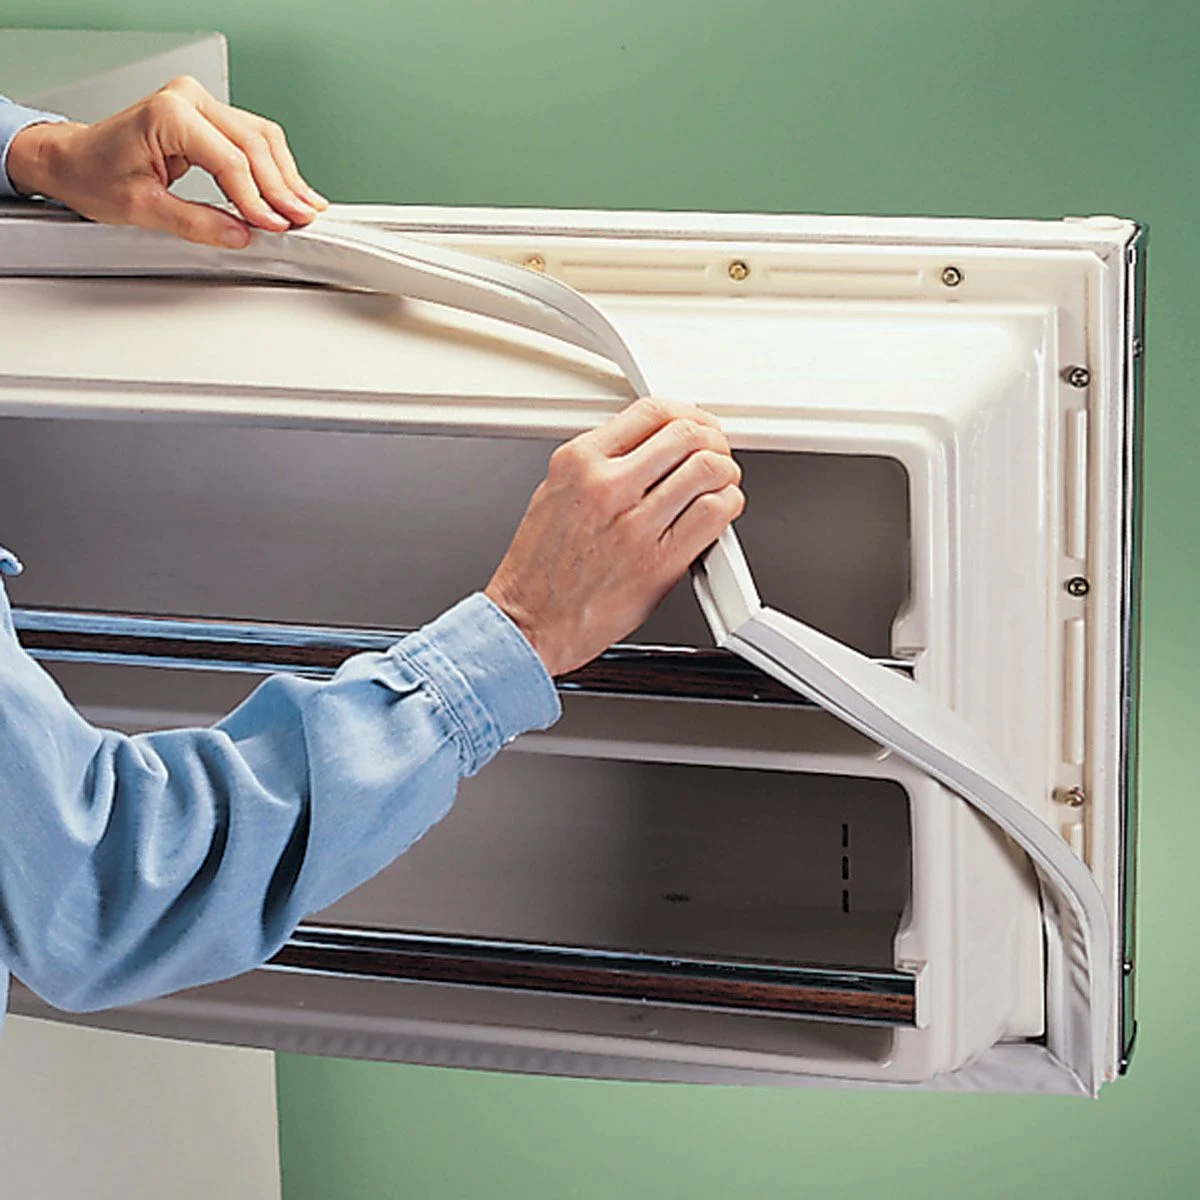
Before you begin the process of replacing the freezer seal on your Kenmore appliance, make sure you have the following tools and materials:

  • New freezer door seal (specific to your Kenome model)
  • Screwdriver or nut driver (depending on your freezer model)
  • Cleaning supplies (mild soap and warm water)
  • Towel or dry cloth

Step-by-Step Guide to Replacing the Seal

Step 1: Purchase the Correct Seal

Purchase a replacement seal that exactly matches your Kenmore freezer model. You can find this information in your freezer’s manual or by searching the model number online. It’s essential to get a compatible seal to ensure a perfect fit.

Step 2: Remove the Old Seal

  • Open the freezer door and inspect the edges where the seal is attached. Some seals are fixed into place with screws, while others might simply be tucked into a groove.
  • If screwed in, use your screwdriver or nut driver to remove them and gently pull the seal away from the door.
  • For seals tucked into a groove, gently pull the seal out, starting from one corner and working your way around the door.

Step 3: Clean the Mounting Area

Once the old seal is removed, it’s important to clean the area where the seal was mounted. Use mild soap and warm water to remove any grime or food particles. Dry the surface thoroughly with a towel to ensure the new seal adheres properly.

Step 4: Install the New Seal

  • Start at one corner of the freezer door and press the lip of the new seal into the groove or over the mounting area.
  • Continue working around the door, making sure the seal is evenly placed and there are no wrinkles or kinks.
  • If your seal requires screws, replace them as you go to secure the seal in place.

Step 5: Check for Proper Installation

Close the freezer door and check for any gaps or areas where the seal isn’t tight against the door frame. A good tip is to place a piece of paper between the seal and the door; if you can pull the paper out easily, the seal isn’t tight enough.

Why Regular Maintenance Matters

Regularly checking and maintaining the seal on your Kenmore freezer is vital for several reasons:

  • Optimal Performance: Ensures that your appliance operates at peak efficiency.
  • Cost Savings: Prevents high energy bills and costly repairs due to motor strain or other mechanical issues.
  • Longevity of Food: Keeps your food in the best possible condition, avoiding waste.

Key Takeaways from TheKitchenApplianceDad.com

  • Regular Checks Are Crucial: Frequently inspect your freezer’s seal for any signs of wear or damage.
  • Proper Fit Is Essential: Always choose a replacement seal that is specifically designed for your Kenmore model to ensure a perfect fit and optimal performance.
  • Clean Before Installation: Cleaning the door frame before installing a new seal can significantly improve its efficacy.
  • Test After Installation: Always check the installation by using a simple paper test to ensure no air is escaping.

Ensuring the integrity of your freezer’s door seal not only helps in maintaining the quality of your stored food but also enhances the overall efficiency of your appliance. By following the steps outlined above, you can effectively replace the seal on your Kenmore freezer and enjoy the benefits of a well-maintained appliance. Remember, a little maintenance goes a long way in ensuring the longevity and performance of your kitchen appliances.

Meet

Dale

Hi, I'm Dale! With over ten years in high volume restaurants, my journey has taken me through the ins and outs of using, maintaining, and even repairing virtually every kitchen appliance imaginable.

I'm here to share simple, straightforward advice to help you choose and use your kitchen tools effectively. No fluff, just the essential info you need to cook up a storm.