Before we get into the nitty-gritty of removing and cleaning the freezer basket, it’s crucial to understand a bit about the design of Kenmore refrigerators. Kenmore offers a range of models, each with slightly different interior designs and features. Generally, the freezer basket is designed for easy removal, but the exact method can vary depending on whether you have a top freezer, bottom freezer, or side-by-side model.
For safety, always unplug the refrigerator before attempting any maintenance. This prevents any electrical accidents and also stops the cooling mechanism, making it safer and easier to work inside the freezer.
Remove all items from your freezer. This will give you clear access to the basket and ensure that nothing gets damaged or thaws out during the cleaning process.
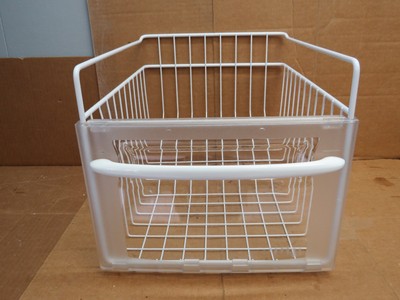
In a bottom freezer, the basket usually slides out on rails. In a top freezer, it may lift out or slide. Identify how your basket is fitted into the freezer.
For sliding models, you’ll typically need to lift the basket slightly at the front to unhook it from the rails and then pull it out towards you. If it has a stop mechanism, you might need to push a lever or button to release it from the track.
Tip: Be gentle to avoid bending or damaging the rails.
These might not have a basket but rather shelves. These shelves often lift up and slide out or have a locking mechanism that needs releasing.
Now that you have successfully removed the freezer basket, it’s time to clean it.
Mix warm water with a squirt of mild dish soap. For stubborn stains or odors, add a tablespoon of baking soda to your solution.
Dip your cloth or sponge in the soapy water and thoroughly wipe down the basket. Use the toothbrush to scrub any hard-to-reach areas or corners.
Once the basket is clean, rinse it under warm water to remove any soap residue. Check all corners and connections to ensure no food particles are left. Dry the basket completely with a towel or let it air dry to prevent ice buildup when reinstalled.
With the basket out, this is a great opportunity to wipe down the interior of the freezer. Use the same cleaning solution and a clean sponge. Focus on any spills or stains. Dry thoroughly.
Before you put the basket back, make sure the rails or guides are not obstructed or dirty. Clean them if necessary.
Carefully align the basket with the rails and slide it back into place. Ensure it locks in securely and slides smoothly.
Once the basket and the interior are dry, you can restock your freezer. This might be a good opportunity to organize and discard any items that are past their best.
Removing and cleaning the freezer basket in your Kenmore refrigerator is a straightforward process that can significantly impact the efficiency and hygiene of your appliance. Regular cleaning prevents the build-up of ice and bacteria and keeps your appliance in top condition. Remember, the exact steps can vary slightly depending on the model of your Kenmore refrigerator, so refer to your manufacturer’s guide for model-specific instructions.
For more helpful tips and appliance advice, keep visiting us here at TheKitchenApplianceDad.com. Happy cleaning!