Welcome back to TheKitchenApplianceDad.com, where we dive deep into the world of kitchen appliance repairs, reviews, and everything in between. Today, we’re tackling a more challenging project: changing the compressor on a refrigerator. This task might seem daunting, but with the right tools and a bit of patience, it’s certainly something you can do at home. Let’s break down the steps so you can get your fridge running smoothly again.
Understanding the Role of the Compressor
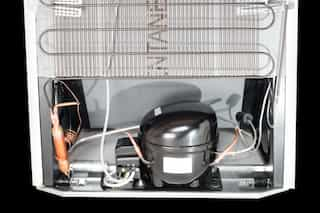
The compressor is often referred to as the “heart” of the refrigerator. It’s responsible for circulating refrigerant throughout the system, which is crucial for cooling. A failing compressor can result in a refrigerator that’s not cooling properly, or worse, not working at all.

Preparing for the Job
Tools and Materials Needed
- New Compressor: Ensure it is compatible with your refrigerator model.
- Refrigerant: Check your fridge’s manual for the correct type.
- Wrench Set
- Screwdrivers
- Vacuum Pump
- Refrigerant Gauges
- Soldering Equipment
- Protective Gloves and Goggles
Safety Precautions
Before you begin, make sure to unplug the refrigerator to avoid any electrical shocks. Also, since you’ll be handling refrigerant, wearing gloves and goggles is crucial to protect yourself from possible injury.
Step-by-Step Guide to Changing the Compressor
Step 1: Access the Compressor
- Remove the refrigerator from its power source.
- Locate the compressor; it’s usually at the back or at the bottom behind a panel.
- Remove the panel using a screwdriver.
Step 2: Remove the Old Compressor
- Disconnect the refrigerant lines from the compressor. Note: This should be done by a certified professional as it involves handling refrigerant.
- Use a wrench to remove the bolts holding the compressor in place.
- Carefully take out the old compressor.
Step 3: Install the New Compressor
- Place the new compressor in the same spot where the old one was located.
- Reattach the bolts to secure the compressor.
- Solder the refrigerant lines back to the new compressor. Ensure all connections are secure to prevent leaks.
Step 4: Vacuum and Recharge the System
- Connect your vacuum pump to the refrigerant system to remove any air and moisture. This step is crucial for the proper functioning of the new compressor.
- Check for leaks in the system.
- Once confirmed no leaks, recharge the refrigerator with the correct type of refrigerant.
Step 5: Test the Refrigerator
- Reconnect your refrigerator to the power source.
- Allow it to run for a few hours and monitor the temperature to ensure everything is cooling properly.
Step 6: Replace the Panel
- Once you confirm the refrigerator is working correctly, replace the back panel.
- Ensure all screws are tightened properly.
Additional Tips
- Documentation: Keep the refrigerator’s manual handy for specific instructions related to your model.
- Professional Help: If you’re not comfortable handling refrigerant or the soldering process, it’s advisable to call a professional.
- Warranty Check: Before proceeding, check if your refrigerator’s warranty covers compressor issues. Sometimes, the warranty might be void if the repair is not done by a certified professional.
When to Call a Professional
Changing a refrigerator compressor involves detailed steps that might be beyond the comfort level of many DIY enthusiasts, primarily due to the handling of refrigerant. If at any point you feel unsure, it’s wise to call a professional. This ensures your safety and the optimal functioning of your refrigerator.
Key Takeaways
- Preparation is Key: Gather all necessary tools and materials before starting.
- Safety First: Always disconnect the refrigerator from power before starting and wear appropriate protective gear.
- Professional Help: Consider hiring a professional for handling refrigerant and ensuring the job is done correctly.
- Regular Maintenance: Keep your refrigerator in top shape by cleaning the condenser coils and checking for any visible issues regularly.
Changing the compressor in your refrigerator can seem like a monumental task, but with careful preparation and attention to detail, it can be manageable. Whether you decide to tackle this project on your own or opt to call in a professional, understanding the process can help you make informed decisions about maintaining and repairing your appliances. For more tips and tricks on handling kitchen appliances, keep visiting us here at TheKitchenApplianceDad.com.