When your refrigerator stops cooling efficiently, one of the potential culprits could be a failing compressor. The compressor is the heart of the refrigerator’s cooling system, circulating refrigerant that helps keep your food fresh and drinks cold. Changing a compressor can be a daunting task, but with the right tools and guidance, it’s achievable. Today on TheKitchenApplianceDad.com, we’ll walk you through the process of changing a compressor on a refrigerator.
Understanding the Importance of a Refrigerator Compressor
Before diving into the replacement process, it’s crucial to understand the role of the compressor in your refrigerator. This component is responsible for compressing the refrigerant and circulating it through the condenser and evaporator coils, where it undergoes heat exchange. This process is what cools the interior of the fridge and freezer. A malfunctioning compressor can lead to a lack of cooling and increased energy bills.

Preparing for Compressor Replacement
Tools and Materials Needed
- New compressor (make sure it’s compatible with your refrigerator model)
- Compressor wiring
- Refrigerant (consult your fridge’s manual for the type)
- Vacuum pump
- Refrigerant manifold gauge set
- Wrench set
- Screwdrivers
- Safety goggles and gloves
Safety First
Before beginning any repairs, unplug your refrigerator to avoid any electrical hazards. Also, since you’ll be handling refrigerant, wearing gloves and safety goggles is essential to protect yourself from potential chemical burns and inhalation.
Step-by-Step Guide to Replacing the Compressor
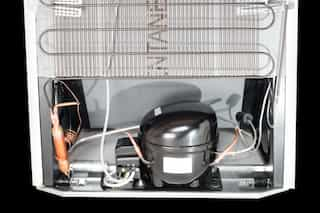
Step 1: Access the Compressor
- Remove the refrigerator’s rear access panel. Use a screwdriver to unscrew the panel and set it aside.
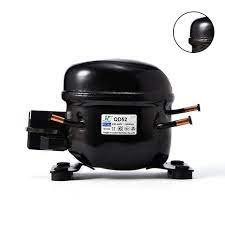
- Locate the compressor. It’s usually at the bottom of the refrigerator, a black tank-like component.
Step 2: Remove the Old Compressor
- Disconnect the compressor wiring. Carefully detach any wiring harnesses connected to the compressor.
- Unscrew the compressor. Use your wrench to remove the bolts securing the compressor to the refrigerator.
- Detach the refrigerant lines. Using your wrench, disconnect the lines. Be cautious as some residual refrigerant may still be present.
Step 3: Prepare the New Compressor
- Attach the new compressor wiring. Connect the wiring harness to the new compressor, ensuring all connections are secure.
- Mount the new compressor. Place the new compressor where the old one was and secure it with bolts.
Step 4: Reconnect the Refrigerant Lines
- Reattach the refrigerant lines. Connect the lines back to the compressor. Ensure they are tight and secure to prevent any leaks.
Step 5: Vacuum and Recharge the Refrigerant System
- Evacuate the refrigerant system. Connect your vacuum pump to the refrigerant system using the manifold gauge set. This process removes moisture and air from the lines.
- Check for leaks. Before adding new refrigerant, ensure there are no leaks. You can use a leak detector or soapy water to check the connections.
- Charge the system with refrigerant. Refer to your refrigerator’s manual for the correct type and amount of refrigerant. Use the manifold gauge to fill the system.
Step 6: Test the New Compressor
- Plug in the refrigerator. Once everything is reassembled, plug the refrigerator back in and monitor it for a few hours to ensure it’s cooling properly.
Step 7: Replace the Rear Access Panel
- Reattach the panel. Once you confirm the fridge is cooling correctly, replace the rear access panel and secure it with screws.
Precautions and Tips
- Handling refrigerant: Dealing with refrigerant requires care. It’s advisable to have proper training or consult with a professional if you’re unfamiliar with handling it.
- Warranty considerations: Check if your refrigerator is still under warranty. Attempting a compressor replacement yourself might void the warranty.
- Recycling old components: Properly dispose of the old compressor and any hazardous materials. Check with your local waste management services for guidelines.
Key Takeaways
- Safety first: Always disconnect your refrigerator from power before starting any repairs and use appropriate safety gear when handling refrigerant.
- Right tools for the job: Ensure you have all necessary tools and materials before you begin, including a correct replacement compressor and refrigerant type.
- Check for leaks: After installing the new compressor and recharging the system, thoroughly check for any leaks to ensure the integrity of the repair.
- Professional help is okay: If at any point you feel out of your depth, don’t hesitate to call a professional. Compressor replacement can be complex and sometimes dangerous.
Changing a compressor can significantly extend the life of your refrigerator and improve its efficiency. By following these detailed steps and tips from TheKitchenApplianceDad.com, you’ll be equipped to tackle this challenging task or make an informed decision about when to call in a professional. Remember, maintaining your refrigerator’s compressor not only ensures your food stays fresh but also contributes to energy efficiency and cost savings in the long run.