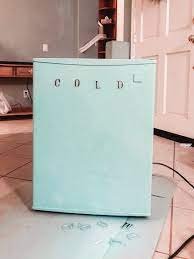
Welcome back to TheKitchenApplianceDad.com! Today, we’re diving into a fun and creative topic that can add a splash of personality to your kitchen, office, or dorm room: painting your mini fridge. Many of us have mini fridges that serve their purpose but might lack a bit in the style department. Whether it’s to inject a little more of “you” into your space or simply to give an old appliance a fresh look, painting a mini fridge can be a rewarding project.
Why Consider Painting Your Mini Fridge?
Mini fridges are often seen as purely functional items, tucked away under desks or in the corners of rooms. However, they don’t have to be an afterthought in your decor. Painting your mini fridge can serve several purposes:
- Personalization: Match your fridge to your room’s color scheme or express your personality with custom designs.
- Restoration: Give a new lease of life to an older fridge that might be working fine but looks a bit worn out.
- Fun Project: It’s a great DIY project that can be both fun and fulfilling.

Choosing the Right Paint and Tools
Before you start your mini fridge makeover, it’s crucial to choose the right type of paint and tools for a smooth and lasting finish.
Types of Paint
- Appliance Epoxy Paint: This is highly recommended for painting appliances like refrigerators. Appliance epoxy is durable, sticks well, and is resistant to the types of wear and tear that kitchen appliances typically undergo. Rust-Oleum offers a specific type suitable for refrigerators.
- Spray Paint: If you opt for spray paint, make sure it’s suitable for use on metal and appliances. Spray paint can be easier to apply evenly but requires good ventilation.
Tools Needed
- Sandpaper (fine-grit)
- Painter’s tape
- A good quality primer (if using regular paint)
- Drop cloths or newspapers
- A well-ventilated space or a respirator mask
Preparing Your Mini Fridge
Preparation is key to ensuring a smooth and professional-looking finish. Here’s how to prep your mini fridge:
- Unplug and Clean: Safety first—make sure the fridge is unplugged and move it to a well-ventilated area. Clean the surface thoroughly to remove any grease or dirt. A mixture of warm water and mild detergent works well.
- Sand the Surface: Lightly sand the surface with fine-grit sandpaper. This roughens up the finish slightly, allowing the new paint to adhere better.
- Tape and Cover: Use painter’s tape to cover any areas you don’t want to paint, such as handles or logos. Cover the floor and surrounding area with newspapers or a drop cloth to protect against paint drips.
Painting Process
Priming
If you’re using regular paint, apply a coat of primer designed for metal surfaces. This helps the paint stick better and prevents rust. Allow the primer to dry completely according to the instructions on the can.
Painting
- Appliance Epoxy Paint: Follow the instructions on the can carefully. Usually, it’s best to apply several light coats rather than one thick coat. Allow the paint to dry between coats.
- Spray Paint: Shake the can well before use. Hold it about 8-12 inches away from the fridge and spray in a steady back-and-forth motion. Apply several light coats, allowing it to dry between applications.
Aftercare and Maintenance
Once your mini fridge is beautifully painted, you’ll want to keep it looking great.
- Curing Time: Allow the paint to cure completely, which can take a few days depending on the type of paint and the environmental conditions.
- Cleaning: Wipe the surface gently with a soft, damp cloth. Avoid harsh chemicals or abrasive cleaning tools.
Potential Challenges and Tips
- Drips and Runs: To avoid drips, keep the can moving as you spray and don’t hold it too close to the surface.
- Ventilation: Always paint in a well-ventilated area to avoid inhaling fumes. Wearing a respirator mask is a good precaution.
- Patience: It might be tempting to rush the process, but patience pays off with a smoother, more professional finish.
Key Takeaways
- Preparation is Key: Proper cleaning, sanding, and taping are crucial.
- Choose the Right Paint: Appliance epoxy or spray paint designed for metal are best.
- Multiple Light Coats: Apply several light coats instead of a heavy one to avoid drips.
- Be Patient: Allow ample drying time between coats and for curing.
Painting your mini fridge can be a great way to personalize an otherwise utilitarian appliance. With the right materials and a bit of elbow grease, you can transform it into a statement piece that reflects your personality while still serving its primary function. Keep these tips in mind, and you’ll be sure to end up with a mini fridge that not only looks fantastic but also brings a touch of custom flair to your space. Thanks for joining me on this creative journey at TheKitchenApplianceDad.com!


