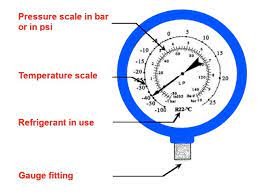
Welcome to another informative post on TheKitchenApplianceDad.com! Today, we’re diving deep into a crucial tool for anyone dealing with HVAC systems: the refrigerant gauge. Whether you’re a professional technician or a DIY enthusiast looking to understand your home air conditioning system better, knowing how to read a refrigerant gauge is essential. This guide will help you grasp the basics and advance your skills in HVAC maintenance and troubleshooting.
What is a Refrigerant Gauge?
A refrigerant gauge is a device used to measure the pressure of refrigerant in an HVAC (Heating, Ventilation, and Air Conditioning) system. These gauges are critical for ensuring that HVAC systems operate efficiently and safely, as incorrect refrigerant levels can lead to reduced system efficiency or damage.
Refrigerant gauges are part of a manifold gauge set, which typically includes a high-pressure gauge, a low-pressure gauge, and hoses that connect to the HVAC system’s service ports.

Types of Refrigerant Gauges
Before we delve into how to read a refrigerant gauge, it’s important to understand the different types available:
Analog Gauges: These are traditional gauges with a dial and a needle to indicate pressure. They are less expensive but can be harder to read precisely due to the manual interpretation of the needle’s position.
Digital Gauges: These provide a digital readout of the pressure, offering more accuracy and easier readability. Digital gauges often come with additional features such as temperature readings, vacuum measurements, and leak detection.
Components of a Refrigerant Gauge
- High-Pressure Gauge (Red): This gauge measures the pressure of the refrigerant as it exits the compressor in its high-pressure, high-temperature state. It’s connected to the high side of the air conditioning system.
- Low-Pressure Gauge (Blue): This gauge measures the suction pressure at which the refrigerant enters the compressor. It’s connected to the low side of the system.
- Hoses: Color-coded hoses (red for high pressure, blue for low pressure, and yellow for the refrigerant supply) connect the gauges to the system’s service ports.
How to Read a Refrigerant Gauge
Step 1: Connect the Gauges
- Turn off the HVAC system. Ensure the system is off before attaching the gauge set to prevent any accidents or misreadings.
- Attach the hoses. Connect the blue hose to the low-side service port and the red hose to the high-side service port. The yellow hose is typically used for adding or removing refrigerant.
Step 2: Turn On the System
- Start the system. Once the hoses are securely attached, start the HVAC system. Allow it to run for about 10 to 15 minutes to stabilize before taking any readings.
Step 3: Read the Gauges
- Observe the readings. The low-side gauge (blue) should generally read between 25 to 40 psi for a properly functioning system, though this can vary based on the specific refrigerant used and the system design. The high-side gauge (red) typically reads between 150 to 275 psi under normal operating conditions.
Step 4: Interpret the Readings
- Compare with expected values. Check the manufacturer’s specifications for the correct pressure readings for your specific model. If the readings are too high or too low, this could indicate issues such as a refrigerant leak, a blockage, or a malfunctioning compressor.
Common Refrigerant Types and Their Pressure Ranges
Different refrigerants operate at different pressure ranges. Here are some common types and their typical operating pressures:
- R-22: Often found in older systems, R-22 has a low-side range of 40-70 psi and a high-side range of 150-250 psi.
- R-410A: Common in newer systems, R-410A operates at a higher pressure, with a low-side range of 100-120 psi and a high-side range of 350-400 psi.
- R-134a: Used in refrigeration and automotive applications, R-134a has a low-side range of 22-57 psi and a high-side range of 130-155 psi.
For more detailed information on refrigerant types and their specific pressure ranges, HVAC manufacturers and the EPA’s website offer extensive resources.
Key Takeaways
- Understand the Types: Knowing whether you are using an analog or digital gauge can affect how you read and interpret the data.
- Proper Connection is Crucial: Always ensure the HVAC system is off when connecting or disconnecting gauges to avoid injury or system damage.
- Reading and Interpretation: Familiarize yourself with the normal operating pressure ranges for the specific type of refrigerant your system uses.
- Consult Professional Help: If the pressure readings are abnormal, it’sadvisable to consult with a professional technician to diagnose and resolve any issues.
Understanding how to read a refrigerant gauge is not just about reading numbers off a dial or a screen. It’s about understanding the health and efficiency of an HVAC system. By mastering this skill, you can ensure that your air conditioning system is running optimally, diagnose problems early, and even extend the life of your equipment.
Thank you for following along with this guide on TheKitchenApplianceDad.com. Whether you’re a seasoned technician or just starting out in the world of HVAC, we hope this post has provided you with the tools and knowledge you need to confidently read and interpret refrigerant gauges. Remember, when in doubt, always consult with a professional who can provide expert advice tailored to your specific situation. Stay cool and stay informed!


