When your Whirlpool freezer door doesn’t seal properly, it can be a source of frustration and inefficiency in your kitchen. Not only does it cause your freezer to work harder, leading to increased energy consumption, but it can also result in food spoilage and increased costs. Luckily, addressing this issue is usually straightforward. Here at TheKitchenApplianceDad.com, we understand the importance of keeping your appliances in top-notch condition. Therefore, we’ve put together a detailed guide to help you fix a Whirlpool freezer door that won’t seal properly.
Before diving into the troubleshooting steps, it’s crucial to understand why a good seal on your freezer door is essential. The seal, also known as a gasket, is designed to create an airtight barrier that prevents the cold air inside your freezer from mixing with the warmer air outside. This not only helps in maintaining the desired temperature inside the freezer but also ensures that the appliance operates efficiently without overworking the compressor.
Several factors can contribute to your Whirlpool freezer door not sealing properly:
First, examine the entire length of the gasket. Look for any signs of wear, tear, or foreign objects that might be obstructing the seal. This inspection will help you determine whether the gasket needs cleaning or a complete replacement.
If the gasket is dirty but intact, cleaning it might solve your problem. Use a mild soap and warm water solution to gently clean the gasket. Avoid using harsh cleaning agents as they can degrade the rubber. A soft cloth or sponge can help you get into the folds and crevices. After cleaning, dry the gasket thoroughly with a soft towel.
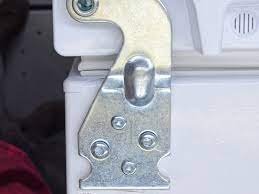
If the gasket is clean and undamaged, the next step is to check the alignment of the freezer door. Sometimes, the hinges can loosen, causing the door to hang incorrectly. Tighten any loose screws on the hinges and adjust the feet of the freezer to ensure it is level. This adjustment can sometimes rectify the sealing issue.
One way to test the effectiveness of the freezer’s seal is the paper test. Close the door with a piece of paper placed so that half of it is in the freezer and half is hanging out. If you can pull the paper out easily without any resistance, the door is not sealing properly. If the paper doesn’t come out or there is significant resistance, your door seal is likely effective.
If none of the above steps work, it may be time to replace the gasket. Gaskets can be purchased from most appliance parts stores or directly from Whirlpool (Whirlpool Parts). Make sure to get the model-specific gasket to ensure compatibility. Replacing a freezer gasket is generally straightforward; carefully remove the old gasket, clean the mounting area, and then attach the new gasket, ensuring it is snug and even all around the door.
To prevent future issues with your freezer door not sealing properly, consider the following tips:
By following these steps, you should be able to fix a Whirlpool freezer door that isn’t sealing properly and ensure your appliance operates efficiently and effectively. Remember, taking proactive steps and addressing issues early canhelp extend the lifespan of your freezer while saving on energy costs. We hope this guide from TheKitchenApplianceDad.com helps you in maintaining the optimal performance of your Whirlpool freezer. Happy fixing!