how-to-replace-the-led-light-in-a-whirlpool-freezer

How To Replace The Led Light In A Whirlpool Freezer

Welcome to another practical guide from TheKitchenApplianceDad.com. Today, we’re diving into a common issue that many homeowners face: replacing the LED light in a Whirlpool freezer. Whether your light has burned out, or you’re just aiming for a brighter interior, this step-by-step guide will ensure you can handle the task with confidence.

Understanding Your Whirlpool Freezer’s Lighting System

Before we start with the replacement process, it’s crucial to understand a bit about the LED lighting system used in modern Whirlpool freezers. LED lights are favored for their longevity and energy efficiency, but even the best components eventually wear out or fail.

Model Variations: Keep in mind that Whirlpool manufactures a variety of freezer models. While the process outlined here will be broadly applicable, there might be slight differences depending on your specific model. Always refer to your freezer’s user manual for model-specific instructions. These manuals can typically be found on Whirlpool’s official website.

How to change your Whirlpool LED Refrigerator lights (no tabs) - YouTube

Tools and Materials Needed

  • New LED Light: Ensure you purchase the correct replacement light. This can usually be sourced directly from Whirlpool or authorized parts dealers.
  • Screwdriver: Most often, you’ll need a Phillips head screwdriver, but check your model’s requirements.
  • Gloves: Optional, but wearing gloves can help prevent any accidental damage from static electricity.

Step-by-Step Guide to Replacing the LED Light

Step 1: Unplug Your Freezer

Safety first! Always unplug your freezer from the electrical outlet before attempting any repairs. This prevents any risk of electrical shock.

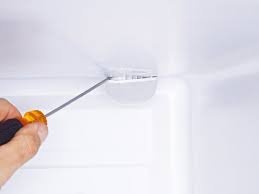
Step 2: Remove the Light Cover

The LED light in a Whirlpool freezer is typically covered by a plastic shield or cover to protect it from moisture and damage. This cover is usually secured with screws or snaps into place.

  • Screws: Use your screwdriver to remove them.
  • Snaps: Gently pry the cover off using a flat tool like a putty knife, taking care not to crack the plastic.

Step 3: Remove the Old LED Light

Once the cover is off, the LED light should be visible. It might be secured with more screws or could simply be plugged into a socket.

  • If screwed in, remove the screws holding the light in place.
  • If it’s a plug-type mount, gently pull the LED bulb out of its socket. A slight wiggle may be necessary to free it if it’s snug.

Step 4: Install the New LED Light

Take your new LED light and install it by reversing the removal process:

  • If it’s a plug-type, align it properly and push it into the socket until it feels secure.
  • If it needs to be screwed in, align it with the holes and tighten the screws.

Step 5: Replace the Light Cover

Once the new LED is securely in place, reattach the light cover:

  • If it snaps on, align it properly and gently press until it clicks into place.
  • If it screws on, replace and tighten the screws without over-tightening to avoid damaging the plastic.

Step 6: Test Your New Light

Plug the freezer back into the electrical outlet and open the door to ensure that the new LED light lights up. If it doesn’t, unplug the freezer and double-check your installation.

Common Troubleshooting

  • Light Doesn’t Turn On: Double-check that the LED is properly connected and that no pins are bent or contacts missed. Also, ensure that the freezer door switch isn’t stuck.
  • Flickering Light: This could indicate a loose connection. Unplug the freezer and recheck the fittings.

Maintaining Your Freezer’s LED Lighting

To keep your freezer’s lighting in top condition, occasionally clean the light cover whenever you notice it getting foggy or dirty. This helps maintain optimal light output and keeps your freezer looking and functioning at its best. Regular maintenance also provides an opportunity to inspect the LED and its connections for any potential issues before they become real problems.

Key Takeaways

  • Safety First: Always unplug your freezer before starting the replacement process.
  • Proper Parts: Use the correct LED light model for your specific Whirlpool freezer.
  • Careful Installation: Handle the LED light and cover with care to avoid damage.
  • Regular Maintenance: Keep the light cover clean and inspect the LED setup regularly.

By following these steps, you should be able to successfully replace the LED light in your Whirlpool freezer without any hassle. Remember, when in doubt, refer to the specific user manual for your model, or contact a professional if you feel uncomfortable performing the replacement yourself. Happy fixing, and stay tuned to TheKitchenApplianceDad.com for more useful tips and guides!
Meet

Dale

Hi, I'm Dale! With over ten years in high volume restaurants, my journey has taken me through the ins and outs of using, maintaining, and even repairing virtually every kitchen appliance imaginable.

I'm here to share simple, straightforward advice to help you choose and use your kitchen tools effectively. No fluff, just the essential info you need to cook up a storm.