
Whether you’re a first-time owner of a Whirlpool bottom freezer refrigerator or you’ve been using one for years, maintaining the quality and taste of your water and ice is crucial. At TheKitchenApplianceDad.com, we understand the importance of keeping your appliances in top shape, which includes regular changes of the water filter. This guide will walk you through the steps to change the water filter in a Whirlpool bottom freezer, ensuring that your appliance continues to provide clean and fresh-tasting water and ice.
Before diving into the process, it’s essential to understand what type of water filter your Whirlpool bottom freezer uses and why it’s important to change it. Most Whirlpool refrigerators use EveryDrop™ filters, which are certified to reduce the most contaminants — using Triple Filtration Technology. It’s recommended that you replace your water filter every six months or more often if your water has a high presence of contaminants.
Most Whirlpool refrigerators come equipped with a status indicator that tells you when it’s time to replace your water filter. This indicator is usually located on the control panel. When the indicator turns red or the water flow to the dispenser or ice maker decreases, it’s a clear signal that the filter needs to be changed.
In most Whirlpool bottom freezer models, the water filter compartment is found in the top right-hand corner of the refrigerator compartment. However, some models may have the filter located in the base grille. Refer to your refrigerator’s owner manual for the exact location. You can usually access the manual on Whirlpool’s official website by entering your model number.
To remove the old water filter, you generally need to either push on it and then pull the filter outwards or turn the filter a quarter turn counterclockwise (depending on the model). Some water might spill as you remove the filter, so having a towel handy is a good idea.
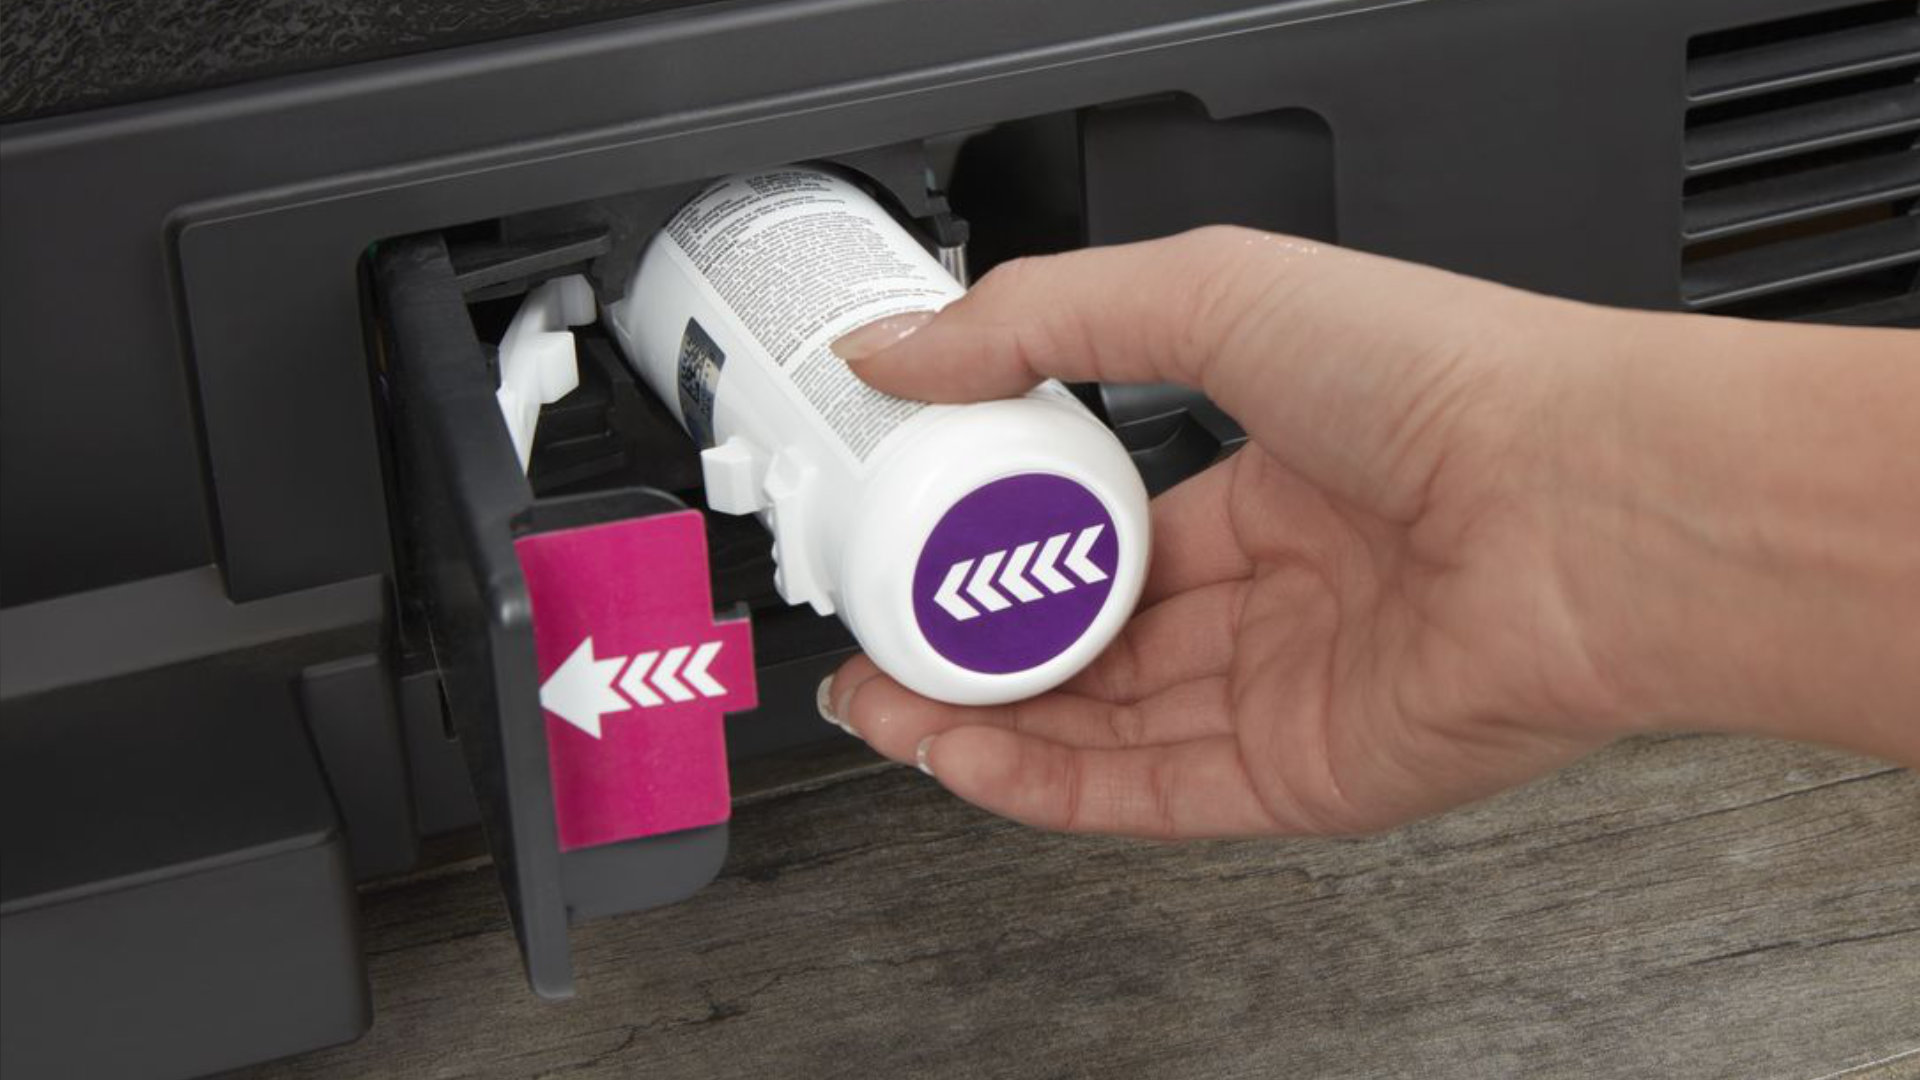
Take your new Whirlpool filter and remove any packaging. If your model requires it, remove the protective caps from the end of the filter. Insert the new filter into the slot by either pushing it in until it clicks or by turning it clockwise until it locks into place. Make sure it’s securely installed to prevent any leaks.
After installing the new filter, it’s important to flush approximately 4 gallons of water through the filter before using it. This process helps to remove any carbon residue or air pockets that might be present in the new filter. Simply dispense water from the water dispenser for about 5 minutes.
Once the new filter is in place and the system has been flushed, remember to reset the water filter status indicator. For most Whirlpool models, this can be done by pressing and holding the filter reset button for a few seconds. The filter status indicator should change from red to green or turn off, depending on your model.
Changing the water filter in your Whirlpool bottom freezer is a simple yet vital task for maintaining the appliance’s performance and ensuring your water and ice are clean and fresh. By following these steps, you can easily replace your refrigerator’s water filter and enjoy the continued benefits of clean, filtered water.
Maintaining your Whirlpool bottom freezer with these simple steps will ensure that you and your family enjoy pureWhether you’re a first-time owner of a Whirlpool bottom freezer refrigerator or you’ve been using one for years, maintaining the quality and taste of your water and ice is crucial. At TheKitchenApplianceDad.com, we understand the importance of keeping your appliances in top shape, which includes regular changes of the water filter. This guide will walk you through the steps to change the water filter in a Whirlpool bottom freezer, ensuring that your appliance continues to provide clean and fresh-tasting water and ice.
Before diving into the process, it’s essential to understand what type of water filter your Whirlpool bottom freezer uses and why it’s important to change it. Most Whirlpool refrigerators use EveryDrop™ filters, which are certified to reduce the most contaminants — using Triple Filtration Technology. It’s recommended that you replace your water filter every six months or more often if your water has a high presence of contaminants.
Most Whirlpool refrigerators come equipped with a status indicator that tells you when it’s time to replace your water filter. This indicator is usually located on the control panel. When the indicator turns red or the water flow to the dispenser or ice maker decreases, it’s a clear signal that the filter needs to be changed.
In most Whirlpool bottom freezer models, the water filter compartment is found in the top right-hand corner of the refrigerator compartment. However, some models may have the filter located in the base grille. Refer to your refrigerator’s owner manual for the exact location. You can usually access the manual on Whirlpool’s official website by entering your model number.
To remove the old water filter, you generally need to either push on it and then pull the filter outwards or turn the filter a quarter turn counterclockwise (depending on the model). Some water might spill as you remove the filter, so having a towel handy is a good idea.
Take your new Whirlpool filter and remove any packaging. If your model requires it, remove the protective caps from the end of the filter. Insert the new filter into the slot by either pushing it in until it clicks or by turning it clockwise until it locks into place. Make sure it’s securely installed to prevent any leaks.
After installing the new filter, it’s important to flush approximately 4 gallons of water through the filter before using it. This process helps to remove any carbon residue or air pockets that might be present in the new filter. Simply dispense water from the water dispenser for about 5 minutes.
Once the new filter is in place and the system has been flushed, remember to reset the water filter status indicator. For most Whirlpool models, this can be done by pressing and holding the filter reset button for a few seconds. The filter status indicator should change from red to green or turn off, depending on your model.
Changing the water filter in your Whirlpool bottom freezer is a simple yet vital task for maintaining the appliance’s performance and ensuring your water and ice are clean and fresh. By following these steps, you can easily replace your refrigerator’s water filter and enjoy the continued benefits of clean, filtered water.
Maintaining your Whirlpool bottom freezer with these simple steps will ensure that you and your family enjoy pure, clean-tasting water and ice, enhancing your daily hydration and overall health.

